Introduction
During development, we often install numerous programs and configure complex environments on development boards. When setting up the same environment on another board, it can be time-consuming and error-prone. This document provides a method to export the file system from a development board and repackage it into a root file system image.
1. Development Environment
Development Board: armsom-p2pro
- CPU: RK3308
- Kernel: 5.10
- OS: Debian11
PC: Ubuntu22.04
Note: The file system on the development board is synchronized with the PC, so both devices must be on the same local network.
2. File Synchronization
We will use rsync to copy all files from the root file system (roorfs) to another Linux server. rsync is a powerful file synchronization tool used to sync files and directories locally or via remote protocols like SSH. It is more flexible and efficient than the standard cp command, especially for large data or regular backups.
2.1 Operations on the Development Board
2.1.1 Install SSH and rsync
sudo apt-get install ssh
sudo apt-get install rsync
2.1.2 Set Root Password
sudo passwd root

# If the current user is already root, run
passwd
2.1.3 Enable Root Login
The PermitRootLogin option in the SSHD configuration determines if root can log in via SSH. It can be set to:
- yes: Allow root login via SSH.
- no: Disallow root login via SSH.
- without-password: Allow root login only with public key authentication.
- forced-commands-only: Allow root login only with forced commands (e.g., scp).
Edit the SSH configuration file and ensure PermitRootLogin is set to:
vi /etc/ssh/sshd_config

# Default is
#PermitRootLogin prohibit-password
Change to
PermitRootLogin yes
After saving the file, restart the SSH service:
sudo systemctl restart sshd
2.1.4 Clean Up Unnecessary Files
Clean up leftover caches or temporary files on the development board to free up space.
First, check disk usage:
du -sh /*
Remove temporary files and caches:
sudo rm -rf /tmp/*
sudo rm -rf /var/tmp/*
sudo rm -rf /var/cache/
This step can be skipped if firmware size is not a concern.
2.2 Operations on the Ubuntu Host
2.2.1 Install SSH and rsync
sudo apt-get install ssh
sudo apt-get install rsync
2.2.2 Synchronize Development Board Files
Ping the development board to ensure connectivity. Create a directory on the Ubuntu host for the exported file system.
lhd@lhd:~/3576_rootfs_test$ mkdir rootfs
Use the following command to sync the file system from the RK3308 development board:
sudo rsync -avx root@192.168.100.123:/ rootfs
Where:
rootis the development board username192.168.100.123is the development board’s IP address/is the root directory on the development boardrootfsis the directory on the Ubuntu host
This step requires root access, as described earlier.
Syncing may take some time. Once complete, the development board’s file system will be synchronized to the Ubuntu host.
2.2.3 Create an Image File
Create an empty image file using dd:
lhd@armsom:~/3576_rootfs_test$ dd if=/dev/zero of=rk3308_rootfs.img bs=1M count=7168
Where:
/dev/zerogenerates a file of specified size with zero contentrk3308_rootfs.imgis the image file to be createdbs=1Mmeans read/write 1M of data at a timecount=4096is the number of blocks to copy
Adjust count based on the development board’s system size, as determined by df -h.
2.2.4 Format the Image File
Format the image file and add a Linux root label:
sudo mkfs.ext4 -F -L linuxroot rk3308_rootfs.img
This command creates an ext4 file system on rk3308_rootfs.img, suitable for data storage or as a disk image.
2.2.5 Populate the Image File
Mount the root file system image and copy the modified file system:
mkdir rk3308_rootfs_mount
sudo mount rk3308_rootfs.img rk3308_rootfs_mount
sudo cp -rfp rootfs/* rk3308_rootfs_mount
If you encounter an error like cp: write error; no space left on device, the dd command’s count was set too small.
After copying, unmount the image:
sudo umount rk3308_mount
2.2.6 Resize the Image File
The image file now contains the development board’s file system, but the file size needs to be adjusted.
Check and resize the image file:
lhd@armsom:~/3576_rootfs_test$ sudo e2fsck -p -f rk3308_rootfs.img
linuxroot: 97295/655360 files (0.1% fragmented), 1442978/2621440 blocks
lhd@armsom:~/3576_rootfs_test$ sudo resize2fs -M rk3308_rootfs.img
resize2fs 1.46.5 (30-Dec-2021)
Resized the file system on rk3308_rootfs.img to 1556652 blocks (4k each).
You now have a complete system image of the original development board.
3. Firmware Deployment
Once the firmware is ready, test and deploy it by flashing the root file system image back onto the development board:
-
Flash the firmware without application deployment.
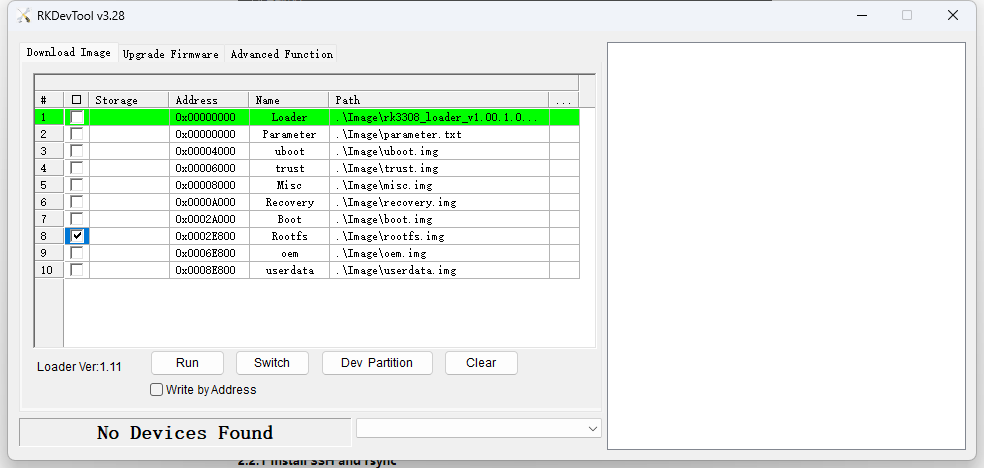
-
Power on the development board and enter LOADER mode. Use the Rockchip RKDevTool v3.28 to flash the firmware, selecting the rootfs partition and verifying partition locations as shown in the image.
-
Verify if the previously deployed files are present in the system.